

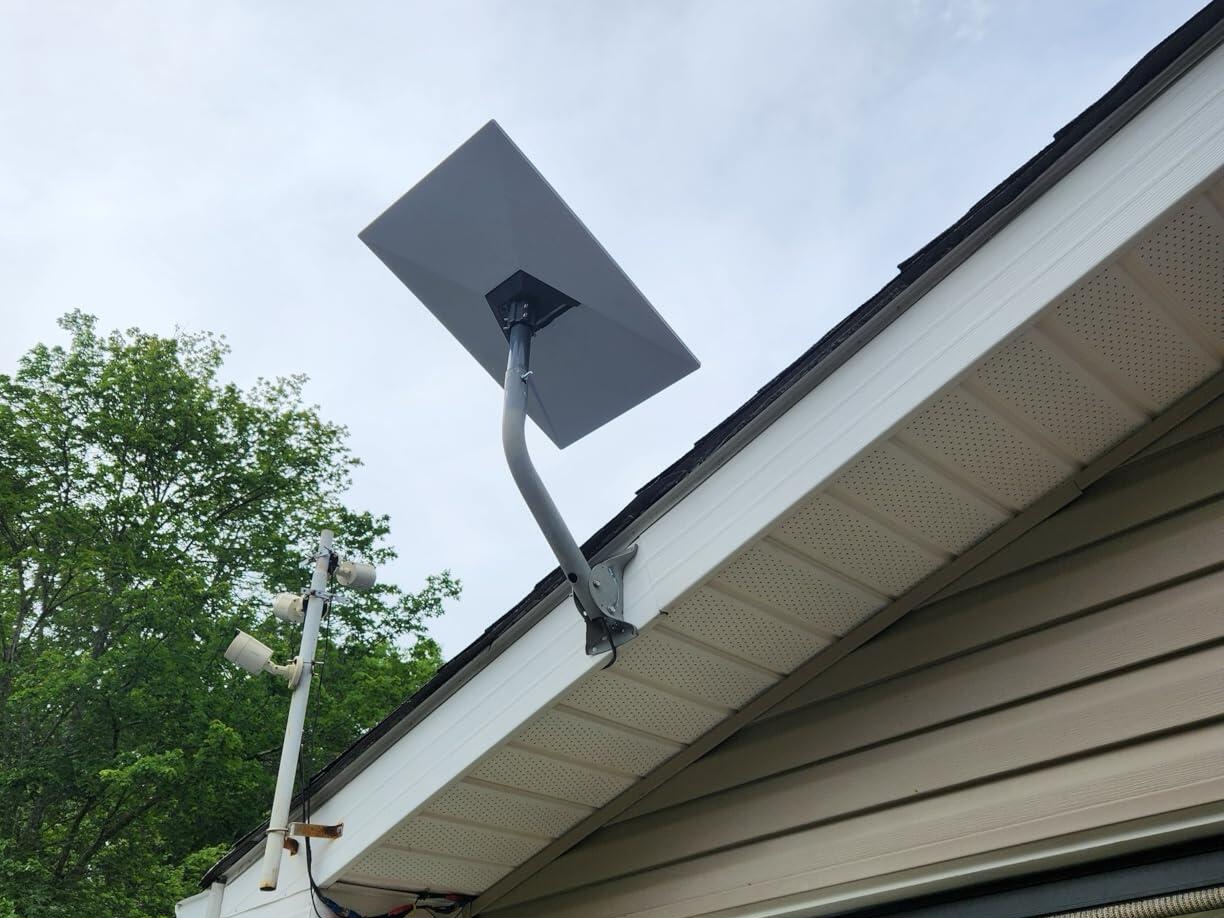
Plan a cleaner and more secure Starlink home installation with compatible wall, roof, pole and cable-routing accessories for houses, offices, shops, warehouses and other fixed locations.
A permanent Starlink installation should provide a clear view of the sky, structural support, protected cable routing and convenient access for future inspection. The correct solution depends on the Starlink model, building structure, roof design and available installation location.
YIZHOU supplies independent third-party accessories compatible with selected Starlink Mini and Standard models. Our range includes wall-mount poles, mounting bases, quick-release adapters and other hardware for fixed installations.
Send us your Starlink model and photos of the intended mounting location. We can help you identify suitable accessory options for further evaluation.
Get an Installation Recommendation
Where Fixed Starlink Installations Are Used
Fixed mounting is suitable when the Starlink terminal will remain at one location for an extended period.
Common applications include:
- Houses and rural residences
- Small offices and commercial buildings
- Shops and warehouses
- Farms and agricultural buildings
- Cabins and remote properties
- Workshops and service facilities
- Schools and community locations
- Temporary buildings requiring longer-term connectivity
Compared with a temporary ground setup, a properly planned permanent installation can provide better cable protection, reduce accidental movement and place the terminal above nearby obstructions.
Start With the Exact Starlink Model
Starlink mounting interfaces are not universal. Accessories designed for Starlink Mini, Standard, Standard Actuated and Performance hardware may have different dimensions and connection methods.
Before selecting a mount, confirm:
- The exact Starlink hardware model
- The terminal dimensions
- The mounting interface
- The cable and connector type
- The preferred terminal orientation
- Whether quick removal is required
If the model name is uncertain, provide a clear photo of the terminal, original stand, connector and product label. Do not select an accessory based only on a general description such as “Starlink dish.”
Starlink Standard for Fixed Installations
Starlink Standard is commonly considered for residential and commercial fixed installations. Compatible mounting categories may include:
- Wall mounts
- Extended wall-mount poles
- Curved or straight mounting poles
- Pivot roof mounts
- Pipe adapters
- Quick-release bases
- Router and power-supply mounts
The Standard terminal, router and power supply are separate components with different placement requirements. Plan the outdoor terminal position and indoor network equipment location together.
Starlink Mini for Compact Fixed Installations
Starlink Mini can also be used in a fixed installation where a compact terminal and DC power flexibility are helpful.
Possible accessory categories include:
- Mini wall mounts
- Pivot mounts
- Pipe adapters
- Quick-release bases
- Protective cable accessories
- Backup battery solutions
Mini includes an integrated Wi-Fi router, but the terminal must still be positioned for a clear view of the sky and connected to a compatible power source.
Check for Obstructions Before Choosing a Mount
The mounting location is usually more important than the appearance of the bracket. Trees, roof sections, chimneys, walls, poles and nearby buildings can interrupt the terminal’s view of satellites.
Before drilling any holes:
- Identify two or three possible installation locations.
- Use the Starlink app to scan each location for obstructions.
- Perform the scan near the intended terminal height.
- Consider future tree and vegetation growth.
- Check whether nearby construction may block the view later.
- Compare cable-routing distance from each location.
Starlink recommends a clear view of the sky for best performance. Its installation guidance indicates that the terminal should have a clear view around the horizon and throughout its field of view.
If a ground-level position is obstructed, an elevated installation on a wall, roof or pole may provide a better location.
Choose the Right Mounting Method
Wall Mount Installation
A wall mount can position the Starlink terminal beyond the edge of the roof or eave while avoiding direct attachment to the main roof surface.
A wall installation should consider:
- Wall material and structural strength
- Stud, beam or masonry anchor location
- Distance from the wall and roof edge
- Terminal clearance
- Cable-routing direction
- Water sealing around fasteners
- Access for tightening and inspection
An extended or curved wall-mount pole may help move the terminal beyond an eave or gutter. A straight configuration may suit walls where sufficient clearance is already available.
The final mount must be secured to an appropriate structural surface. Siding, decorative panels or thin cladding alone may not provide adequate support.
Sloped-Roof Installation
A pivot mount can be considered for installation directly on a sloped roof. The mounting angle can be adjusted so the terminal is positioned according to its installation requirements.
Roof installation planning should include:
- Roof material
- Rafter or structural-member location
- Roof pitch
- Flashing and sealant method
- Water-flow direction
- Cable entry
- Installer access and fall protection
Drilling through a roof can create a leak if the penetration is not sealed correctly. A qualified roofing or installation professional should be used when the roof structure or waterproofing method is uncertain.
Flat-Roof Installation
A flat roof may offer a wide view of the sky, but the mount must be positioned away from parapet walls, equipment, vents and areas where water collects.
Consider drainage, wind exposure, cable protection and whether the roof membrane permits drilling. If a non-penetrating mounting method is used, its ballast and wind-load requirements must be evaluated for the location.
Pole Installation
A pole mount can raise the terminal above trees, fences, low buildings and other nearby obstructions.
The installation should account for:
- Pole diameter
- Pole material and wall thickness
- Foundation or structural attachment
- Wind loading
- Adapter compatibility
- Cable strain relief
- Inspection and maintenance access
- Local electrical and lightning-protection requirements
Do not attach a Starlink terminal to a weak television antenna mast or other pole without confirming its structural capacity.
Balcony or Railing Installation
Balcony and railing installations may be useful where roof access is limited. However, the building itself, an upper balcony or nearby wall may obstruct part of the sky.
The railing must be strong enough for the mount and terminal. The installation should also prevent components from falling onto people or property below.
Quick-Release or Permanent Mount?
A permanent connection may suit installations where the terminal will rarely be removed. A quick-release system may be useful when removal is required for maintenance, security, seasonal storage or relocation.
| Installation type | Advantages | Important considerations |
|---|---|---|
| Permanent mount | Simple, stable and suitable for long-term placement | Must retain access for inspection and replacement |
| Quick-release mount | Easier removal and maintenance | Locking mechanism must remain securely engaged |
| Temporary stand | No permanent building modification | More exposed to movement, impact and cable damage |
A quick-release mount should not introduce excessive movement between the terminal and the building structure. Check the locking components during routine maintenance.
Cable Routing and Building Entry
Cable routing affects both appearance and long-term reliability. The route should protect the cable from sharp bends, abrasion, standing water and accidental pulling.
A cable plan should include:
- Total cable length
- Minimum bend radius
- Exterior UV exposure
- Wall or roof entry location
- Drip loops before building entry
- Weather sealing
- Interior route to the router or power supply
- Future access and replacement
Do not place the connector under mechanical tension. Support the cable close to the terminal and at appropriate intervals along the route.
Avoid routing the cable where it can be crushed by doors or windows, damaged by roof edges, submerged in standing water or exposed to high-temperature equipment.
Router and Power-Supply Placement
The outdoor terminal, router and power supply may have different environmental ratings. Equipment placement must follow the requirements of each individual component.
Starlink describes the Standard Router 3 as water resistant but configured for indoor use. It should be installed in a suitable interior location rather than left exposed with the outdoor terminal.
Choose a router location with:
- Access to power
- Ventilation
- Protection from water and excessive heat
- A central position for Wi-Fi coverage
- Access to Ethernet connections if required
- Space for inspection and cable management
Do not hide the router or power supply in a sealed, unventilated box unless the enclosure and thermal design are intended for that equipment.
Weather and Structural Considerations
A terminal’s environmental rating does not automatically apply to a third-party mount, cable accessory, wall fastener or building penetration. Each part of the installation must be assessed separately.
Review the following conditions:
- Expected wind exposure
- Rain and water drainage
- Snow and ice accumulation
- Temperature range
- Corrosion risk
- Roof and wall material
- Fastener material
- Local building requirements
Product material, coating and test documentation should be reviewed before claiming a mount is suitable for severe weather, coastal exposure or other demanding environments.
A Six-Step Fixed-Installation Process
- Identify the terminal. Confirm the exact Starlink model and mounting interface.
- Check the sky. Use the Starlink app to compare possible mounting locations.
- Inspect the structure. Confirm that the wall, roof, pole or railing can support the installation.
- Select the mounting hardware. Choose a wall, roof, pole or quick-release solution designed for the model.
- Plan the cable route. Determine exterior protection, building entry and interior equipment placement.
- Install and verify. Secure all components, seal penetrations and check alignment in the Starlink app.
Example Fixed-Installation Configurations
Starlink Standard Wall Installation
Suitable for houses, shops and warehouses:
- Starlink Standard compatible wall-mount adapter
- Straight, curved or extended wall-mount pole
- Structural wall fasteners
- Exterior cable clips
- Protected cable-entry components
- Indoor router and power-supply mounting
Starlink Standard Sloped-Roof Installation
Suitable where the roof provides the clearest view:
- Model-specific pivot mount
- Structural roof fasteners
- Appropriate flashing or sealing materials
- Cable-routing components
- Interior equipment mounting
Starlink Mini Pole Installation
Suitable for cabins, farms and compact fixed installations:
- Starlink Mini compatible pipe adapter
- Structurally suitable pole
- Locking and fastening hardware
- Compatible DC power cable
- Cable strain relief
- Optional backup battery
These are example configurations rather than universal kits. Final accessory selection depends on the Starlink model, building structure and local installation conditions.
Information We Need to Recommend a Mount
Please provide the following information:
- Starlink model or terminal photos
- Country and project location
- House, office, warehouse or other building type
- Wall, roof, pole or balcony installation preference
- Photos of the mounting surface
- Wall or roof material
- Approximate distance to the indoor router location
- Permanent or quick-release requirement
- Required quantity
Installers and distributors can also request samples, wholesale quotations, packaging information and available product documentation.
Frequently Asked Questions
Is a wall mount or roof mount better for Starlink?
The better option is the one that provides a clear view of the sky and a structurally suitable installation surface. A wall mount may avoid roof penetration, while a roof mount may offer better clearance from nearby obstructions.
Can Starlink be installed on the side of a house?
Yes, when a model-compatible wall mount positions the terminal with the correct orientation and sufficient clearance. The mount must be attached to a suitable structural surface rather than decorative cladding alone.
Can I reuse a Starlink Gen 2 mount with Gen 3?
Do not assume direct compatibility. Starlink generations may use different mounting interfaces. A model-specific adapter may be required, and its compatibility should be confirmed before installation.
Can the Starlink router be installed outdoors?
Follow the environmental and placement requirements for the exact router. Starlink describes Router 3 as water resistant but configured for indoor use, so it should normally be placed in a suitable protected interior location.
Does a permanent Starlink installation require a professional?
Professional installation is recommended when the work involves roof access, structural uncertainty, building penetrations, difficult cable routing or electrical-safety concerns.
Do you supply official Starlink mounts?
No. YIZHOU supplies independent third-party accessories designed for compatibility with selected Starlink hardware. We are not affiliated with or endorsed by Starlink or SpaceX.
Plan the Right Starlink Fixed Installation
A successful Starlink home installation begins with the correct terminal identification, a clear mounting location and hardware suited to the building structure.
Send us your Starlink model, installation photos and estimated quantity. We can help you review compatible wall, roof, pole and quick-release mounting options.
Get an Installation Recommendation
Technical References
- Starlink Residential Installation Guidance
- Starlink Standard Wall Mount Installation Guide
- Starlink Standard Pivot Mount Installation Guide
- Starlink Standard Specifications
Starlink and SpaceX are trademarks of Space Exploration Technologies Corp. YIZHOU is an independent supplier of third-party compatible accessories and is not affiliated with, authorized by or endorsed by Starlink or SpaceX.